How do I fix bowing or warping in my horizontal fence?
As discussed in other articles, one of the challenges of any horizontal fence, whether wood, plastic, or composite, is making sure the rails stay true both vertically and horizontally. The Horizons (and, similarly, Seclusions Horizontal) fence system takes advantage of the metal frame components and interlocking design to keep the pickets from distorting. However, improper installation or high humidity and heat may cause the pickets to swell, which can cause bowing. There are a few essential steps and remedies to deal with this issue.
Pre-installation considerations to avoid bowing
Shorter Post Centers
For installations in high heat and humidity, if you have not yet finalized your project plan and purchase, consider shortening the width of the sections. The shorter the distance between the vertical posts, the lower the possibility of picket flexing, and if the pickets do bow, it will be less noticeable.
Preventative measures during installation
Leaving gaps to allow for expansion
If you have already purchased your materials, be sure to follow the instructions regarding expansion as as noted in the installation guide. A gap of at least 3/8" of an inch on each side of the fence panel is necessary to allow the pickets to expand (reference Step 7B in the installation guide). Since the post centers are 97" (and therefore 92" between posts), typically there will be sufficient room for the standard 91" board to fit with gaps without trimming. However, extruded composite material like Trex pickets can vary slightly in length and therefore may not be exactly 91", so check the measurements of your pickets before installing them to make sure they are no more than 91" in length. If you are installing the fence in cold dry weather, bear in mind that even though the pickets may have sufficient room now, in hot and humid weather they may not.
Ensuring pickets interlock
Trex pickets are designed to interlock. This not only gives the fence its unique design and added strength, it also helps the pickets keep their form. Therefore, if the bottom picket sits too high and cannot interlock, some adjustments will be necessary. First, evaluate if you can achieve the results you are looking for by using fewer pickets. If fewer pickets gives you too much of a gap under the fence, you can rip the last picket to make sure the top of the bottom picket interlocks with the picket above it (be sure ALL pickets interlock). You should never rip any picket except the one at the bottom of the fence. This picket will be screwed to the metal horizontal bottom rail which will give it the rigidity lost by ripping the bottom edge off the picket. Here is what the bottom rail will look like after ripping the bottom and screwing it to the Horizons bottom rail. Your measurements will vary depending on how much room is left at the bottom after installing all the remaining pickets. Keep in mind that it is best to have approximately 1" of clearance at the bottom to avoid constant contact between the ground and the metal bottom rail. If the fence is installed in an area with water-saturated soil that is likely to heave and come in contact with the bottom of the fence, consider a bigger gap underneath.

Our Horizons Installation Guide provides more details in regards to general installation, measurements, instructions, etc.

Resolving bowing if the fence is already installed
If the fence was not installed properly and the pickets have bowed because the boards weren't cut to provide the necessary expansion gaps or the pickets are no longer interlocked, the fence may need to be unassembled to allow reinstall correctly. Usually, only Steps 7B through 9 are necessary, although it may also be necessary to rip the bottom picket as described in the section immediately above this one.
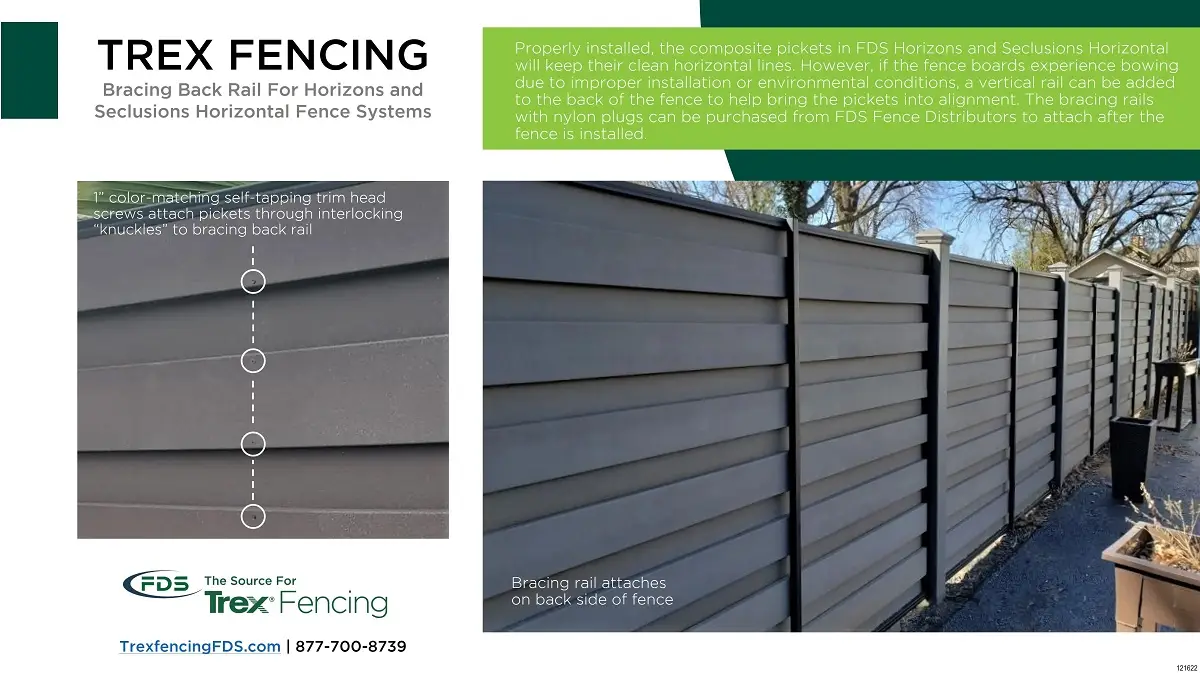
If the Horizons fence pickets won't relax after the boards are cut to allow for the necessary gaps (permanent deformation may occur if the pickets have been bowed for an extended period of time), a vertical back bracing rail can be applied. This component helps to bring the pickets back into alignment. On the back side of the fence, screw the bracing rail to the top and bottom Horizons horizontal rails. Then, fasten screws from the other side through the composite pickets into the back bracing rail. To make sure you screw through the pickets into the back bracing rail, temporarily attach a string to the middle of the to top rail and pull it tight over the front of the fence panel, then pull the string through the bottom and attach it in the middle of the bracing rail at the bottom of the fence. This creates a straight line that you can use as your guide to fasten the screws. Only fasten the screws through the pickets that touch the back bracing rail. Use self-tapping screws with color matching heads for best results (FDS can supply these with the back bracing rail upon request).
Part Numbers for Vertical Back Bracing Rail application:
- TFHMSB-8 = Vertical Back Bracing Rail (Vendor description: "Horizons Mid Span Brace Black")
- TFHMSB-Cap = Caps for Back Rail
- Screws: DFES350JB = Woodland Brown, DFES350GY = Winchester Grey, DFES350BN = Saddle
- Paint-Textured = Paint to touch up any exposed metal